
Sound fades in and out on Windows 11
Download Windows Speedup Tool to fix errors and make PC run faster
Some users report that sound fades in and out on their Windows 11 computers. This issue significantly impacts the user experience, as they cannot play games or watch videos properly. This can happen for several reasons, including a corrupt audio driver, incorrect sound settings, or a conflicting third-party app or service. If this issue affects your gaming and media playback, use the fixes below.
If audio fades in and out on your Windows 11 PC, use these fixes:
- Run Audio Troubleshooter
- Roll back the audio driver
- Reinstall the audio driver
- Disable Audio Enhancements
- Change the advanced settings for your audio device
- Disable the Communications setting
- Troubleshoot in Clean Boot State.
All these fixes are explained in detail below:
1] Run Audio Troubleshooter
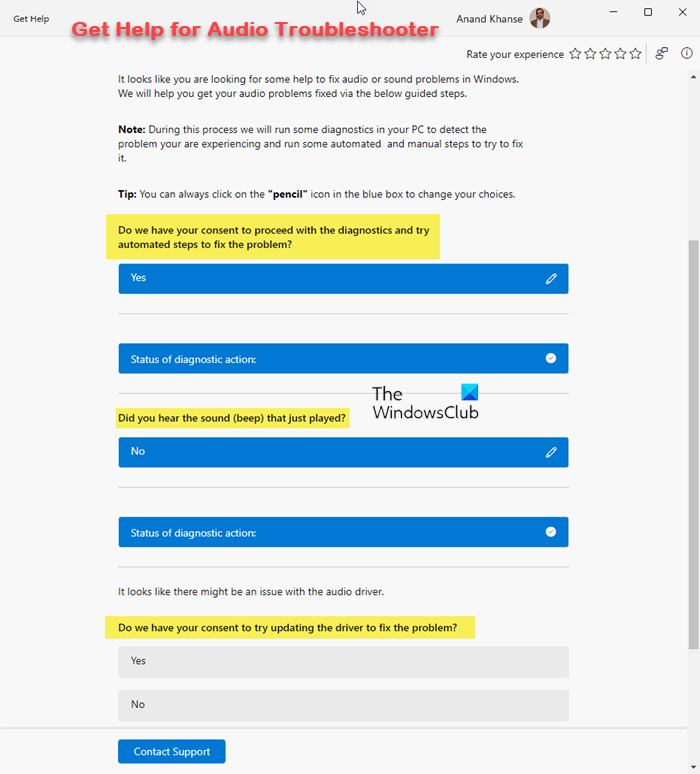
Windows has a built-in tool, the Audio Troubleshooter, to fix sound issues. Before trying advanced fixes, we suggest you run this troubleshooter and see if it works. You can run the Audio Troubleshooter through the Get Help app or Windows 11 Settings. It runs automated tests on your system and tries to fix the issue.
2] Roll back the audio driver
The corrupt audio driver is the most common cause of this problem. To verify this, roll back the audio driver.
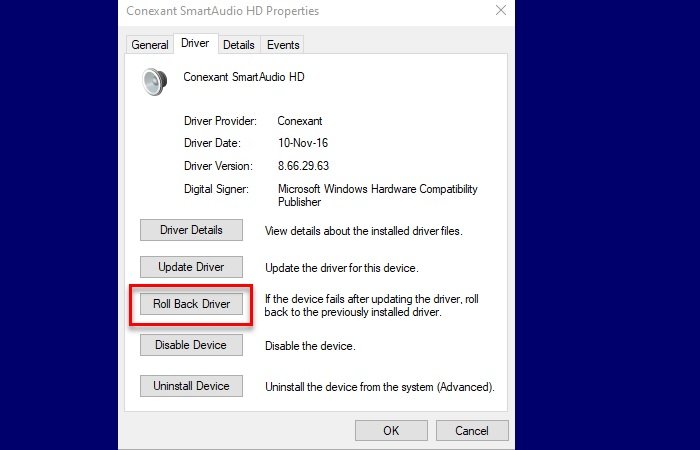
The following steps will guide you on this:
- Open the Device Manager.
- Expand the Sound, video and game controllers branch.
- Right-click on the audio driver and select Properties.
- Navigate to the Driver tab.
- Click the Roll Back Driver button and follow the on-screen prompts to install the previous version of the driver.
If the Roll Back Driver option is greyed out, you can use other methods to install the earlier version of the audio driver.
3] Reinstall the audio driver
If rolling back the audio driver doesn’t help, reinstalling it can fix the issue. Before proceeding, create a system restore point. Now, follow the steps provided below:
- Open the Device Manager.
- Expand the Sound, video and game controllers branch.
- Right-click on your audio driver and select Uninstall device.
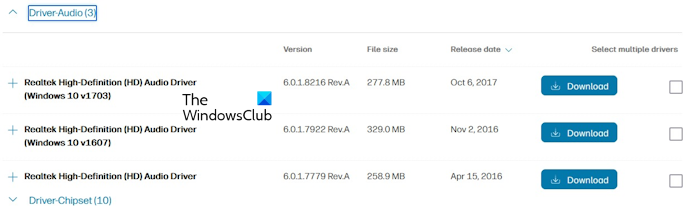
- Visit your computer manufacturer’s official website and download the latest version of the audio driver.
- Run the installer file to install the driver.
Now, check if the issue persists.
4] Disable Audio Enhancements
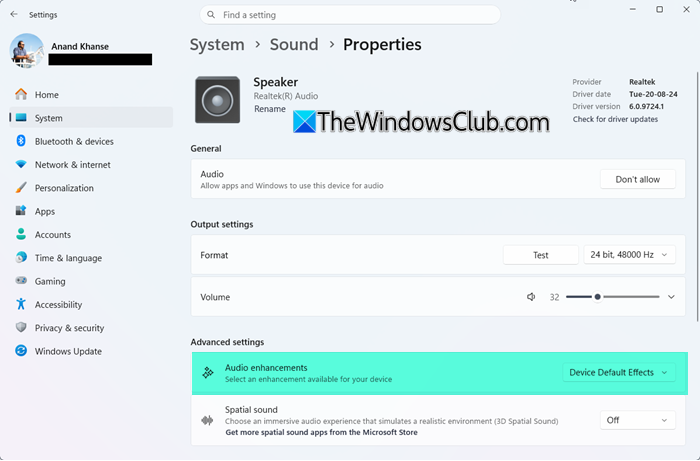
To disable Audio Enhancements in Windows 11:
- Press Win+I to open Windows Settings
- Go to System > Sound settings
- Locate your Output device or Speaker and click on the arrow to open its Properties
- From the available dropdown options, set it to Off.
5] Change the advanced settings for your audio device
You can also try changing the advanced settings for your audio device. By default, the “Allow applications to take exclusive control of this device” setting remains enabled for your audio device, causing compatible applications to take control of the audio device. Disabling this option may help fix the audio fading issue on your system by removing the conflicts between the applications trying to access the same audio device.
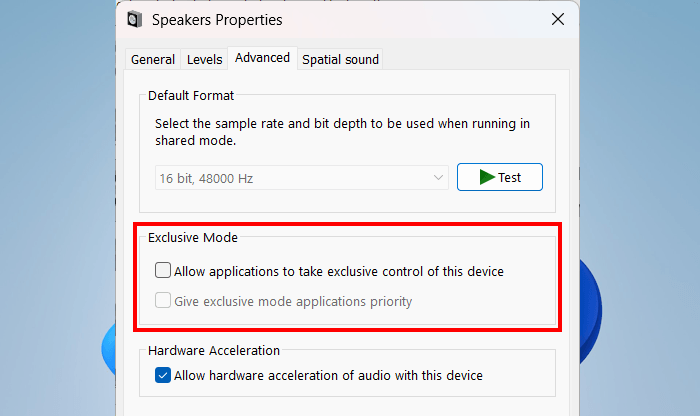
The following steps will help you:
- Open the Control Panel.
- Type sound in the Control Panel search bar.
- Click Sound from the search results.
- Right-click your default speaker under the Playback tab and select Properties.
- Navigate to the Advanced tab and uncheck the “Allow applications to take exclusive control of this device” checkbox.
- Click Apply and then click OK.
Repeat the same steps for the Recording tab. If the issue still persists, disable the Audio enhancements too for your audio device.
6] Disable the Communications setting for your audio device
Windows automatically adjusts the volume of different audio devices when you use your PC to place or receive telephone calls. This feature might be interrupting your audio experience. Therefore, you can disable it temporarily while playing games or watching videos.
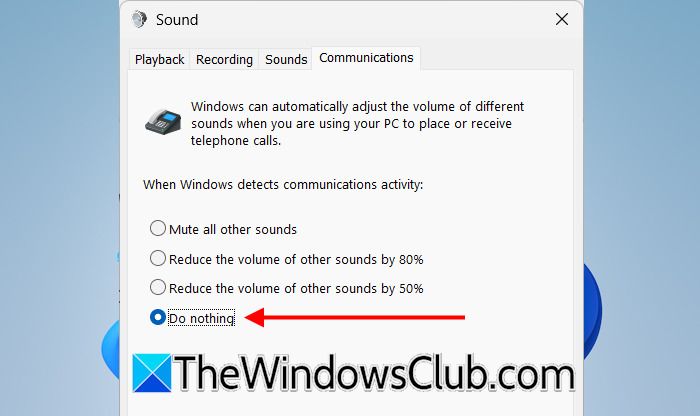
The following steps will guide you on this:
- Open the Sound settings via the Control Panel.
- Go to the Communications tab.
- Select Do nothing.
- Click Apply and then click OK.
7] Troubleshoot in Clean Boot state
A third-party application or service might be conflicting with your audio device and triggering this problem. To verify this, disable all the startup apps and restart your system. Now, check if the issue persists. If yes, the next step is to troubleshoot in a Clean Boot state by disabling all the third-party services. For this, you have to use MSConfig. Be careful while performing this action. If you disable all the services by mistake, your system will become unstable, and you have to reinstall Windows. Performing the clean installation of Windows will erase all the data from the drive partition on which you install Windows.
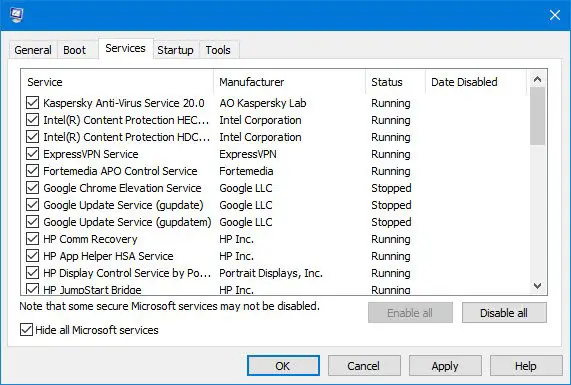
Once you are in Clean Boot mode, check whether the issue persists. If not, a third-party service is causing the problem. Now you need to identify the problematic service. For this, enable some of the disabled services and check if the issue occurs. When the issue reappears, one of the services that you have just enabled is the culprit. Next, uninstall the program the service is associated with.
I hope this helps.
How to fix Windows 11 sound issues?
To fix Windows 11 sound issues, first, run the Audio Troubleshooter. It will run some automated tests on your system to fix the audio problems. If that doesn’t work, try rolling back, updating, or reinstalling the audio driver. Most sound problems on Windows 11 are caused by a corrupt audio driver. You can also try changing the sound format to see if that works.
How do I stop Windows from changing my audio output?
Windows does not include an option to disable the automatic audio switching. This behaviour of Windows is by design. When you connect an audio device, Windows makes it the default device. However, if the issue occurs frequently even when you don’t connect an external audio device, unwanted audio devices might be causing it. Remove all the unwanted audio devices. Also, you can troubleshoot in a Clean Boot state to see whether a third-party service is responsible.
Read next: No speakers or headphones are plugged in on Windows.

Anand Khanse is the Admin of TheWindowsClub.com, a 10-year Microsoft MVP (2006-16) & a Windows Insider MVP (2016-2022). Please read the entire post & the comments first, create a System Restore Point before making any changes to your system & be careful about any 3rd-party offers while installing freeware.
内容来自 The Windows Club,版权归原作者所有。
阅读原文 ↗